
Getting Started
The tutorial assumes that you are familiar with App Inventor and that you can use the Component Designer to lay out a screen, and the Blocks Editor to specify the behaviour of the app. If not then head on over to the MIT App Inventor site and click on Getting Started. This will take you through the installation and a few tutorials. You'll need to have done at least one introductory tutorial to make sure that everything works and that you have mastered the basics.If you want to make your own clock hands you will need to know how to create images with transparency. Paint.NET can make PNG files with transparency. Don't worry if this sounds a bit tricky, You can use some of my hands instead.
So now you've got your system set up you can start on this tutorial.
Clock Tutorial
This tutorial demonstrates how sprites can be used to animate the hands of a clock. You can build a clock with any face and hands that you design or choose.
The end result will be a simple clock that has moving hours, minutes and seconds.
This tutorial covers:
Using the sprite component on a canvas including the position, scaling and rotation properties.
Using the clock component to tick seconds and drive the hands.
Scaling the app. to suit the screen size.
Using the screen orientation property to rescale the app. when the screen is turned.
Part 1 - Start a new project and add the components
We'll build this app in stages doing a little bit at a time. Log into App Inventor and start a new project. Name it "Clock". When the Design window opens notice that App Inventor automatically names the screen "Screen1", but you can set the Title of the screen, which will show up in the top bar of the app. Think of a title for your clock, or feel free to use the suggested title "Clock", and type it into the Properties pane on the right side of the Designer.
In the Screen Properties (shown in right-hand pane): Uncheck the checkbox labeled "Scrollable" so that the screen will not scroll when the app is running. Screens that are set to scroll do not have a height. We’ll need our clock to have a defined height in order to scale it properly.
The hands must be created in a paint program like Paint.NET. The hands will be loaded as sprites. Sprites rotate about their centre but clock hands rotate about one end. You can change the centre of rotation by working out the x/y offsets but this is tedious arithmetic. Instead if you make the hands the full height of the clock it will rotate about the correct axis. But you don't want the clock to have propellers for hands. The trick is to make the bits that you don't want transparent.
How to make the hands in a paint program. Make a thin vertical rectangle the height of the clock face. This same rectangle will be used for all of the hands so make it wide enough. Make the whole rectangle transparent and draw the hand on it. Here are three hands that were used. The transparent area is painted in red so that you can see it. The hour hand is short and fat, the minute hand is long and thin. The second is long and thinner. Each hand has a small black edge to lift the hand from the background. They all rotate about their centre.


 Add these components and name them
Drawing and Animation -> Canvas
>
The clock will have a background image for the clockface. Draw your own or Google "clock face" to pick something suitable, A suitable clock face will be square with a size of over 500 pixels or a high enough resolution to suit your phone. Upload this Media asset and make it the screen background. You'll see the clockface get stretched but you will fix that later. The clockface that I used had a black background so I set the screen background color to black to match.
Set the background image of the Canvas to the clock face.
And in the canvas add the hands
Drawing and Animation -> ImageSprite -> hour.png -> hourSprite
Drawing and Animation -> ImageSprite -> minute.png -> minuteSprite
Drawing and Animation -> ImageSprite -> second.png -> secondSprite
User Interface -> Clock -> -> Clock1
Don't worry about the scaling and where the hands are positioned, this is fixed later on.
This completes the component layout.
Part 2 - Adding the behaviours
To make something happen right away, switch to the block editor and lets put in the clock event. The angle of the hands is controlled by the heading property.

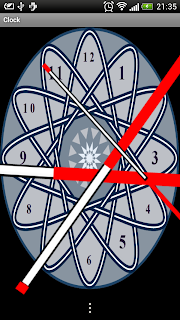 Now the hands are moving and pointing in the correct direction, But they are still randomly positioned. Note that I have coloured the transparent parts of the hands red so that you can so how it is working. Normally the red bits are erased. The background is also stretched to fill the screen. Lets fix that next.


This creates a local variable which is the current time. We only read this once so that each update will use this time value throughout. A second hand ticks 6 degrees every second so we multiply the seconds by 6. But it is -6 because the clock rotates, well clockwise. If you run this the second hand will animate, but it will be in completely the wrong place.
Now we can add the other hands. Unlike the second hand they move smoothly and not in discrete steps. This means that we need to calculate the angle for a particular time. The calculations are a bit more complicated. For the minutes the hand moves 6 degrees per step and the hour hand is 30 degrees. The final calculation is shown here.


 Now the hands are moving and pointing in the correct direction, But they are still randomly positioned. Note that I have coloured the transparent parts of the hands red so that you can so how it is working. Normally the red bits are erased. The background is also stretched to fill the screen. Lets fix that next.
Part 3 - Scaling the canvas
The clock background is square so we need to make the height the same as the width.To do this try making this fragment:

Test it out by right clicking on it and selecting Do It. The clock face will magically be scaled correctly. Now turn your phone sideways and select Do It again. The clock face will become too big so we need a more elaborate scaling routine.
We add a test to check which is shorter, the width or the height and set the canvas dimensions to that value. Then we bundle this up into a procedure called scale. To set up the correct scale we add it to the screen initialise event. We also call it when the screen is rotated so that it always fits the available space.

Part 4 - Scaling and positioning the hands
We need to move the hands to the centre of the clock face. Another way to look at it is the coordinate will be half of the width of the clock face.
Just extend the scale procedure so it uses the width value that we found to set the height of the hands. Then we divide the width by two and use that to set the X and Y of each hand. Note that due to the width of the hands (23) we need an x offset of -12 to move the hands exactly to the centre. The final code will look like this:

Now the clock is working what else could you do with it? A cartoon character with pointing hands like the Mickey Mouse watch. An elaborately decorated face with intricate hands. A clock that changes faces during the day. A clock that has a sunrise and sunset dial. A clock with a moon phase display. Translucent hands are also possible if you know how to control transparency in PNGs. My clock does something especially useless. The hands fall loose when you shake the phone.
Source files for the project are in this archive
Source files for the project are in this archive